21.36

Happy Chinese New Year!

Diposting oleh Agus Sudrajat |

Long time no blog...  I've been quite sluggish ever since the holiday season.  But I just had my monthly origami class at a senior residency, and I thought I would share the experience through my blog because it was a lot of fun!

The residency had a monthly theme of China for January so I decided that we make an origami pagoda.  Each participant made one tier in different size, and I stacked them together.  It came out to be an 11 tier pagoda!  This was a project that I had never offered before so I was not quite sure if a tall paper building like this could stand on its own, but it did!  Pretty cool!

Before the class I had made a sign that says Happy New Year in Chinese, using red and gold, which are auspicious colors for Chinese.  Everyone put her/his signature on it, and I displayed the pagoda and the sign together.


As for the origami pagoda model I used, I'm not sure where I got it originally, but I've seen it all over origami books so perhaps it is densho.  It might even be Chinese densho.  Here is one instruction I found online.

06.45

Felicitari

Diposting oleh Agus Sudrajat |


03.34

San Valentine's 2-Colored Heart

Diposting oleh Agus Sudrajat |


Designed By Kazuo Kobayashi
Folded By Me (Mariela Recinos)

Valentine's Day is near. Therefore, this beautiful and easy 2-colored heart is perfect for the occasion.  You can use it to decorate cards or to give it to someone special. Enjoy it Origami Maniacs!!!!!!!


INSTRUCTIONS:


03.02

Bunny Cube by Kazuo Kobayashi

Diposting oleh Agus Sudrajat |


Designed by Kazuo Kobayashi
Folded By Me (Mariela Recinos)

Hello Origami Maniacs......this time I bring something I found in a very nice book, and I liked it. This cute bunny cube is easy to make and it looks great. Children love it. I hope you like it. Do your best.....


INSTRUCTIONS:


It's been a very long time since I've taken the time to post anything - I've missed it.  A lot has changed: we've moved states, I'm employed again (Yay!), and I'm still working on going to school online.  I wish I had more time to do origami and post about it.  Sadly, until I'm out of school (not going to happen soon enough) I'll just have to do it whenever possible.

The latest origami model that I've been folding (a little obsessively) is the Origami Magic Star that was created by the amazing creators of Oriland.  A link to the YouTube video of their model in action is here.  You can buy the e-book on how to fold the model here.  The creators have a Flickr page with pictures of fan-folded models here.

The model can be folded in several different ways; from as many as 48 squares of paper to 12 strips of paper to 6 strips of paper all the way to the extremely impressive single sheet of paper (here is a picture of someone that tackled this daunting task).  My favorite way to fold the model is the one that is the most modular: by using 48 squares of paper.

No matter what initial folding method is used to create the units, the final assembly method is pretty much the same.  The model is essentially created through 6 rings that are interlocked (unless the single sheet of paper method is being used).  For myself, the hands-down most difficult point is the assembling of the final ring to the first one.  The creators show a technique that interlocks everything nicely, but I have yet to be able to assemble is without tearing the paper.  Thankfully, the points where the paper tears aren't seen and don't seem to affect the model.

So, without further rambling here are the pictures and videos of the models that I have folded.  Normally pictures are completely sufficient to show off origami, but the reason this model is so fantastic is that its an action model.  I've got a picture of each of the models followed by a short video clip of them.

This is my first Oriland Magic Star. I already had almost all of the squares cut out that were left over from a different project. When I purchased the e-book and was looking through the various color patterns that were shown I instantly liked the checkerboard  pattern and wanted to try it first. 
The next pattern that I attempted was the basic 'ring' style.  My wife picked out the colors and as a result they go very well together :-)
After seeing the first 2 models that I had made my Mom of course requested one.  To make things easier on me she requested the basic rainbow colors.  In the video you can see that several of the colors 'walk' around the model as it is rotated (the red is probably one of the easiest to see).
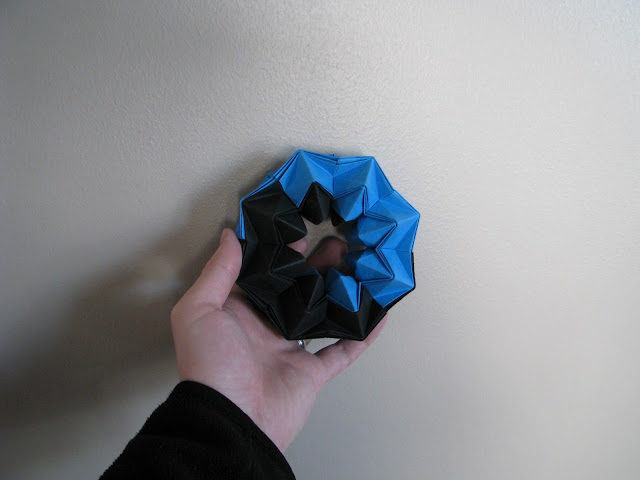
My oldest son's favorite colors are black and blue. After I made the first magic star he was begging for me to make one for him.  So for the pattern here I used the Yin-Yang design that the authors describe. The blue and black colors seemed to chase each other as they rotate around.  I will say that I was a little disappointed in the recommended pattern as it rotates one way and then back again instead of continuing to rotate in the same direction.
My next model was made for my oldest sister who happened to be visiting in the area for Christmas ( I usually only get to see her once or twice a year and so don't get much opportunity to share my folding with her).  After making the Yin-Yang model I decided to change the pattern a little to see if I could get the desired effect I was hoping for.  Here it is close; not exactly what I was hoping for, but much closer and gave me the direction I needed to continue to try.
And so the next one I made was for my Dad.  He has an office job and displays a few of the origami things I've made for him.  Of course when most people see something intriguing on someones' desk at work they have to pick it up to examine it.  As a result I don't give anything to my Dad to take to work unless it is solid and durable - as these models are.  Here I finally achieved the pattern I wanted.  The red color simply 'walks' all the way around the model as it is rotated; endlessly :-)
Finally, this is the model that I made for my  youngest son, who isn't quite 2 yet.  My wife tells me that anytime someone has their magic star out he wants to put it on his head like a crown.  So, she asked me to make one for him to walk around with.  That made me wonder just how large I would be able to make it.  The model on the left is my oldest son's and is about 6 or 7 inches in diameter.  The other one is considerably larger :-)
Sadly, I don't have a video of it in action yet.  But as soon as I do, I will post it.
This last video is for entertainment purposes.  When the models are assembled, there is a certain spot in the rotation that can hold a particular amount of tension (likely due to the faults of my assembly).  So, if you're not careful they can kind of jump out of your hands :-D

There have actually been a few other models that I have folded and am in the process of folding.  I either need pictures/videos of them or I need to finish them.  Either way, my school work is currently having to come before anything (dang school is always getting in the way of fun).

I totally recommend purchasing this e-book from Oriland.  The instructions are fantastic and all in color.  The directions are very clear and easy to understand.  Be warned, though, that the final assembly does get a little tricky and may take a couple of attempts.  But the end result is totally worth it!


17.08

Origami Flower By Stephen Hecht

Diposting oleh Agus Sudrajat |


Designed By Stephen Hecht
Folded By Jo Nakashima

This is a beautiful flower made with the same piece of paper. You will need a lot of patience since it is not so easy, but it is worthy. Do your best Origami Maniacs!!!!!


INSTRUCTIONS:


Pictures taken from

23.16

Scufita Rosie

Diposting oleh Agus Sudrajat |

Initial am vrut sa intitulez aceasta postare "Snow White" dar lucrurile au luat o mica intorsatura, asa ca am schimbat eroina :D

Scufita Rosie plimbandu-se prin zapada spre bunicuta:


Lupul mare si rau papand la Scufita Rosie:

Scufita Rosie fericita ca a scapat de lupul mare si rau imbratisata dragastos de bunicuta:
Disclamer:  Ordinea cronologica a pozelor nu corespunde cu ordinea lor din aceasta postare. 

Ultimul model l-am obtinut din cocorul din prima poza si se numeste Mother Crane and Young - gasiti CP-ul aici: http://www.flickr.com/photos/burningpaperdragons/5772503800/ .

20.40

Origami Heron

Diposting oleh Agus Sudrajat |

Dear Reader,

Here is a traditional origami design using the bird base. If you can fold a crane, you should have no problem folding this heron.

Check out our origami heron instructions:


06.13

Beautiful Origami Rose by Hiromi Harashi

Diposting oleh Agus Sudrajat |


Designed by Hiromi Harashi
Folded by Irenebichua

Even though these beautiful roses look complicated, they are very easy to make. The design is so beautiful, and it is a perfect present for a special woman.....a mother, a wife, a girlfriend......whoever you want....
Have a good time Origami Maniacs.....


INSTRUCTIONS:


Pictures taken from

05.56

MeiIris' Origami Rose Valentine

Diposting oleh Agus Sudrajat |


Folded by MeiIris

This is a beautiful rose that can be used exactly like in the video inside a heart shaped box. It will be a great present for someone special. I hope you like it Origami Maniacs.....


INSTRUCTIONS:


Pictures taken from

05.39

Dinara cu inimioare

Diposting oleh Agus Sudrajat |


Model: Dinara un pic modificata
Autor: Marcia Moura
Diagrama: http://www.origamichile.cl/gui/diagramas/pdf/dinara.pdf

Model (baza cu dungulite): Geosphere
Autor: Miyuki Kawamura

05.39

Origami Heart Box By Robin Glynn

Diposting oleh Agus Sudrajat |


Designed By Robin Glynn
Folded By Jo Nakashima

 This is a beautiful heart shaped box that you can make for the coming Valentine's Day. Anybody who receives it will love it.
Try to do your best Origami Maniacs and be patient.


INSTRUCTIONS:

THE BASE


THE LID


Pictures taken from

05.26

Origami Heart with Pocket

Diposting oleh Agus Sudrajat |


Traditional Design
Folded by Danbergam

This is a very easy origami heart with a special pocket in it in order to put a message for that special person in Valentine's. I hope you like it Origami Maniacs.......Enjoy it!!!!


INSTRUCTIONS


Pictures taken from

07.00

Origami Cute and Colorful Peacock

Diposting oleh Agus Sudrajat |


From the Book 大好き折り紙
Folded by Me (Mariela Recinos)

This is a very cute and colorful peacock that is made up by 8 different easy to make modules. I hope you enjoy it Origami Maniacs....


INSTRUCTIONS:


06.49

Origami Cute Pelican

Diposting oleh Agus Sudrajat |


From the book 大好き折り紙
Folded by Mariela Recinos

This cute and easy origami pelican can be made by small children since its design is very simple and nice. Enjoy it Origami Maniacs.......


DIRECTIONS:


05.26

Inimioare

Diposting oleh Agus Sudrajat |


Se apropie luna februarie si cu ea Sfantul Valentin si Dragobetele. Asa ca va prezint o combinatie de origami si quilling in tonul acestor sarbatori.


Modelul este din cartea "Unit origami fantasy" (Tomoko Fuse)

03.36

Origami Heart Bookmark

Diposting oleh Agus Sudrajat |


Designed by Fumiyaki Shingu
Folded by Heather

Valentine's Day is coming so many people are thinking about decorations and presents related with the holiday. This time, a cute bookmark is presented here for you to fold. It looks great and it is so easy to make. you can make many of them for friends. Good luck Origami Maniacs......


INSTRUCTIONS:


Pictures taken from

Subscribe